I have a use case where I need to clients to add their bank information, and then I need to periodically pull their bank information. I want to use Plaid for this, since it is capable of storing bank information in a secure way, but I don’t know how
1 Like
Here is a guide on how to use Plaid in Foundry:
First - Why Plaid? Plaid is a financial data aggregation platform that enables end users to securely connect their bank accounts to third-party applications. Plaid leverages OAuth and other secure authentication flows, allowing users to authorize access without exposing their credentials to your application. With this integration pattern, Foundry can ingest bank account and transaction data while never directly handling sensitive authentication information.
overall flow:
- generate plaid link token - This is a short-lived, one-time-use token generated by our backend (compute modules in this case). It’s used to initialize Plaid Link, the client-side UI that allows users to connect their bank accounts. The link token ensures that the connection process is secure and scoped to a specific user session. This will be generated in a compute module, since it uses your plaid client id and secret and therefore shouldn’t be exposed to end users.
- generate public token - An OSDK app will need to be setup for Plaid Link to be used. Once the user successfully links their account through Plaid Link, Plaid returns a public token. This token is a temporary credential representing the user’s authorization to access their bank data. Importantly, the public token doesn’t expose any sensitive info - it’s just a proof that the user completed the Plaid Link flow.
- Exchange Public Token for Access Token - In the action that has the public token as an input parameter and is triggered from the OSDK app, you’ll exchange the public token (along with your Plaid client ID and secret) for a long-lived access token.
- Using the API! - You can use this access token (again with your client ID and secret) in a transform to retrieve the actual bank details you need, like account and transaction info, without ever handling the user’s bank credentials directly.
Warning before starting:
- this is a technically challenging workflow to setup. You will need to use data connections, compute modules, OSDK applications, object types + action types, python functions, and source based external transforms with REST API calls. This walkthrough assumes basic knowledge of all of the above applications.
Without further ado, here are the steps!
Step 1 - setup a plaid data source for storing the client id and secret.
- this needs to rest source. On the source, put the url as https://sandbox.plaid.com for testing. No need to add authentication details, at the bottom you can add a clientId and secret as additional secrets. The client id key should be additionalSecretClientId and the secret should be additionalSecretClientId.
- you will also need to add egress policies. Most likely, you should add sandbox.plaid.com development.plaid.com, and production.plaid.com.
- since we will be using the source in a compute module, you need to turn on ”Enable exports to this source“ and “Enable exports to this source without markings validations“. In the code import configuration, make sure to check off code repositories, functions, and compute modules. Name your api ”PlaidRestSource“
Step 2 - plaid link token function (compute module)
- here we need to setup a compute module to generate a plaid link token. The reason we can’t do this in python functions is the plaid pypi package we need was causing environment issues in python functions, and compute modules allows us to run arbitrary docker images, which resolves the environment issue in this case.
- Since this compute module function will be called from an osdk app, we need to make this a functions module. “No Platform Permissions” is fine here.
- Next, we need to publish our docker image to an artifacts repo, and connect it to our compute module. If you haven’t done that before, the “Build a compute module backed function” section of the documentation tab will show you what you need to do.
- Here is what the python script should look like:
        from compute_modules.annotations import function
        import os
        import json
        import urllib3
        from plaid import Configuration, ApiClient
        from plaid.api import plaid_api
        from plaid.model.link_token_create_request import LinkTokenCreateRequest
        from plaid.model.link_token_create_request_user import LinkTokenCreateRequestUser
        from plaid.model.country_code import CountryCode
        from plaid.model.products import Products

        # for dev purposes
        urllib3.disable_warnings()

        @function
        def generate_link_token(context, event):
            # get client user id from param
            client_user_id = event.get('client_user_id')

            # use source with client id and secret
            with open(os.environ['SOURCE_CREDENTIALS'], 'r') as f:
                credentials = json.load(f)
            client_id = credentials['PlaidRestSource']['additionalSecretClientId']
            client_secret = credentials['PlaidRestSource']['additionalSecretClientSecret']

            configuration = Configuration(
                host='https://sandbox.plaid.com',
                api_key={'clientId': client_id, 'secret': client_secret}
            )
            api_client = ApiClient(configuration)

            # for dev purposes
            api_client.rest_client.pool_manager.connection_pool_kw['cert_reqs'] = 'CERT_NONE'
            client = plaid_api.PlaidApi(api_client)

            request = LinkTokenCreateRequest(
                user=LinkTokenCreateRequestUser(client_user_id=client_user_id),
                client_name='Plaid Docker App',
                products=[Products("auth"), Products("transactions")],
                country_codes=[CountryCode('US')],
                language='en'
            )
            return client.link_token_create(request).link_token

        @function
        def hello(context, event):
            return 'Hello ' + event.get('name', 'World')
- assuming the script lives in src/app.py, your docker image can look like this:
FROM --platform=linux/amd64 python:3.12
COPY requirements.txt .
RUN pip install -r requirements.txt
COPY src .
# USER is required to be non-root and numeric for running Compute Modules in Foundry
USER 5000
CMD ["python", "app.py"]
- and then requirements.txt
foundry-compute-modules
plaid-python>=11.0.0
- Once you create a container in Foundry, you can create these files locally and push the docker image to the container using the command line. Since we aren’t encoding the input and output types into this function, you will have to do it through the UI (or update the python script). Once this function is working, we can give it an API name (in my case I called it generateLinkToken) and head over to the ontology manager application / developer console to setup the OSDK app.
Step 3 - create an ontology object type (and action type) to store public tokens generated in the application
- This ontology object type can be anything, as long as it stores the public token that we will generate in the osdk app. For me, I just created a simple object type that stores a primary key, user id, the public token, access token, metadata, and a created on timestamp
- An action is also needed here so that after the OSDK app gets a user’s public token, it can save the public token to the ontology and generate an access token.
- In my case, the action API name I used in the OSDK app is called createPlaidPublicTokenStore.
- For the action logic, we need to hit the Plaid API to exchange the public token for an access token. The reason we need to do this is the public token can only be used once, and needs to be used within 30 minutes of generation. The access token on the other hand, lasts forever.
- Since the access token needs to be encrypted, we will use a library called fernet from the package encryption. This will allow us to create an encryption key, store it on the source, and then encrypt / decrypt the access tokens accordingly. The reason we have to do this is because data sources don’t allow for programmatic adding of secrets.
- Feel free to make the encryption key whatever you want. you can make the encryption key’s key EncryptionKey. Since it is an additional secret on the datasource, the key will be additionalSecretEncryptionKey.
- The function backed python action looks like this:
        from functions.api import function, OntologyEdit, UserFacingError, Timestamp
        from ontology_sdk import FoundryClient
        from ontology_sdk.ontology.objects import PlaidPublicTokenStore
        from functions.sources import get_source
        from cryptography.fernet import Fernet


        @function(edits=[PlaidPublicTokenStore], sources=["PlaidRestSource"])
        def add_public_and_access_token_to_plaid_object_type(
            uniqueId: str,
            metadata: str,
            publicToken: str,
            user: str
        ) -> list[OntologyEdit]:
            # create and set object properties
            ontology_edits = FoundryClient().ontology.edits()
            editable_plaid_obj = ontology_edits.objects.PlaidPublicTokenStore.create(uniqueId)
            editable_plaid_obj.metadata = metadata
            editable_plaid_obj.public_token = publicToken
            editable_plaid_obj.user = user
            editable_plaid_obj.created_on = Timestamp.now()

            source = get_source("PlaidRestSource")

            # get access token
            access_token = get_access_token(source, publicToken)

            # encryption key
            key_str = source.get_secret("additionalSecretEncryptionKey")
            key = key_str.encode()
            f = Fernet(key)
            encrypted_token = f.encrypt(access_token.encode()).decode()
            editable_plaid_obj.access_token = encrypted_token

            # Decrypt the encrypted token like this
            # decrypted_token = f.decrypt(encrypted_token.encode()).decode()

            return ontology_edits.get_edits()


        def get_access_token(source, public_token: str) -> str:
            url = 'https://sandbox.plaid.com/item/public_token/exchange'

            payload = {
                'client_id': source.get_secret("additionalSecretClientId"),
                'secret': source.get_secret("additionalSecretClientSecret"),
                'public_token': public_token}

            client = source.get_https_connection().get_client()
            response = client.post(url, json=payload)
            data = response.json()

            if response.ok:
                return data['access_token']
            else:
                raise UserFacingError("Not able to convert to access token.  error: " + str(data))
- To get this working, you will have to add the source to your repo. You will also have to add the necessary libraries “cryptography” being the main one here.
- You will need to add your object types in the resource imports tab in the sidebar. My object type’s API name is PlaidPublicTokenStore which might not be your object type’s API name.
Step 4 - create an OSDK app to allow users to auth through Plaid Link and generate a public token / access token.
- Start in developer console. If you already have an existing OSDK app that you want to use, feel free to navigate to that application and simply update the OSDK package.
- If you are starting from scratch, make a new application with an empty OSDK except for the compute module query function, and the action type that adds to the object type that stores the public token. On the platform SDK side, add the admin-read resource, so that we can read the current users user-id.
- If you haven’t created an OSDK application before, it’s a good idea to start with the todo application one state.
- You can set the application to be client facing with user permissions.
- Once the application is initialized, you can create the following react component. You will need to update things like the Api name,
        import React, { useEffect, useState } from 'react';
        // eslint-disable-next-line import/named
        import { usePlaidLink, PlaidLinkOnSuccessMetadata, PlaidLinkOnExitMetadata, PlaidLinkError } from 'react-plaid-link';
        import { generateLinkToken, createPlaidPublicTokenStore } from '@plaid-integrator/sdk';
        import client from './client';
        import { Admin } from "@osdk/foundry";

        export const PlaidLinkWrapper: React.FC = () => {
          const [linkToken, setLinkToken] = useState<string | null>(null);
          const [userId, setUserId] = useState<string | null>(null);

          // Fetch user ID and then link token when the component mounts
          useEffect(() => {
            const fetchData = async () => {
              try {
                // Step 1: Fetch the user
                const user = await Admin.Users.getCurrent(client);
                const id = user?.id;
                setUserId(id);
                console.log("User ID:", id);

                // Step 2: Only fetch link token if we have a user ID
                if (id) {
                  const response: string = await client(generateLinkToken).executeFunction({
                    "client_user_id": id
                  });
                  setLinkToken(response);
                  console.log("Generated link token using user ID:", id);
                }
              } catch (err) {
                console.error("Error fetching user or link token:", err);
              }
            };

            fetchData();
          }, []);

          const onSuccess = async (public_token: string, metadata: PlaidLinkOnSuccessMetadata) => {
            // Handle the public_token and metadata
            console.log('Public Token:', public_token);
            console.log('Metadata:', metadata);

            try {
              console.log('Creating Plaid public token store with:', { public_token, userId });
              const result = await client(createPlaidPublicTokenStore).applyAction({
                publicToken: public_token,
                metadata: JSON.stringify(metadata),
                user: userId!
              });
              console.log('Token store created successfully:', result);
            } catch (error) {
              console.error('Error creating token store:', error);
            }
          };

          const onExit = (error: PlaidLinkError | null, metadata: PlaidLinkOnExitMetadata) => {
            // Handle the case when the user exits the Plaid Link flow
            if (error) {
              console.error('Error:', error);
            }
            console.log('Exit Metadata:', metadata);
          };

          // Only render PlaidLink component when we have a token
          if (!linkToken) {
            return (
              <>
                <div style={{ marginBottom: '12px' }}>
                </div>
                <p>Loading link token...</p>
                <p>user id: {userId}</p>
                <button disabled>
                  Connect a bank account
                </button>
              </>
            );
          }

          return (
            <PlaidLinkComponent
              linkToken={linkToken}
              userId={userId}
              onSuccess={onSuccess}
              onExit={onExit}
            />
          );
        };

        // Separate component that uses the hook
        const PlaidLinkComponent: React.FC<{
          linkToken: string;
          userId: string | null;
          onSuccess: (public_token: string, metadata: PlaidLinkOnSuccessMetadata) => void;
          onExit: (error: PlaidLinkError | null, metadata: PlaidLinkOnExitMetadata) => void;
        }> = ({ linkToken, userId, onSuccess, onExit }) => {
          const config = {
            token: linkToken,
            onSuccess,
            onExit
          };

          const { open, ready } = usePlaidLink(config);
          const isButtonEnabled = ready && userId !== null;

          return (
            <>
              <div style={{ marginBottom: '12px' }}>
              </div>
              <p>link token: {linkToken}</p>
              <p>user id: {userId}</p>
              <p>Plaid ready: {String(ready)}</p>
              <p>Is button enabled: {String(isButtonEnabled)}</p>
              <button
                onClick={() => open()}
                disabled={!isButtonEnabled}
              >
                Connect a bank account
              </button>
            </>
          );
        };
- You can then add the component to your existing application. In my case, I just added it somewhere in the Home.tsx file.
- Test this out, and once your application successfully saves a public token / access token to the ontology, you can move on.
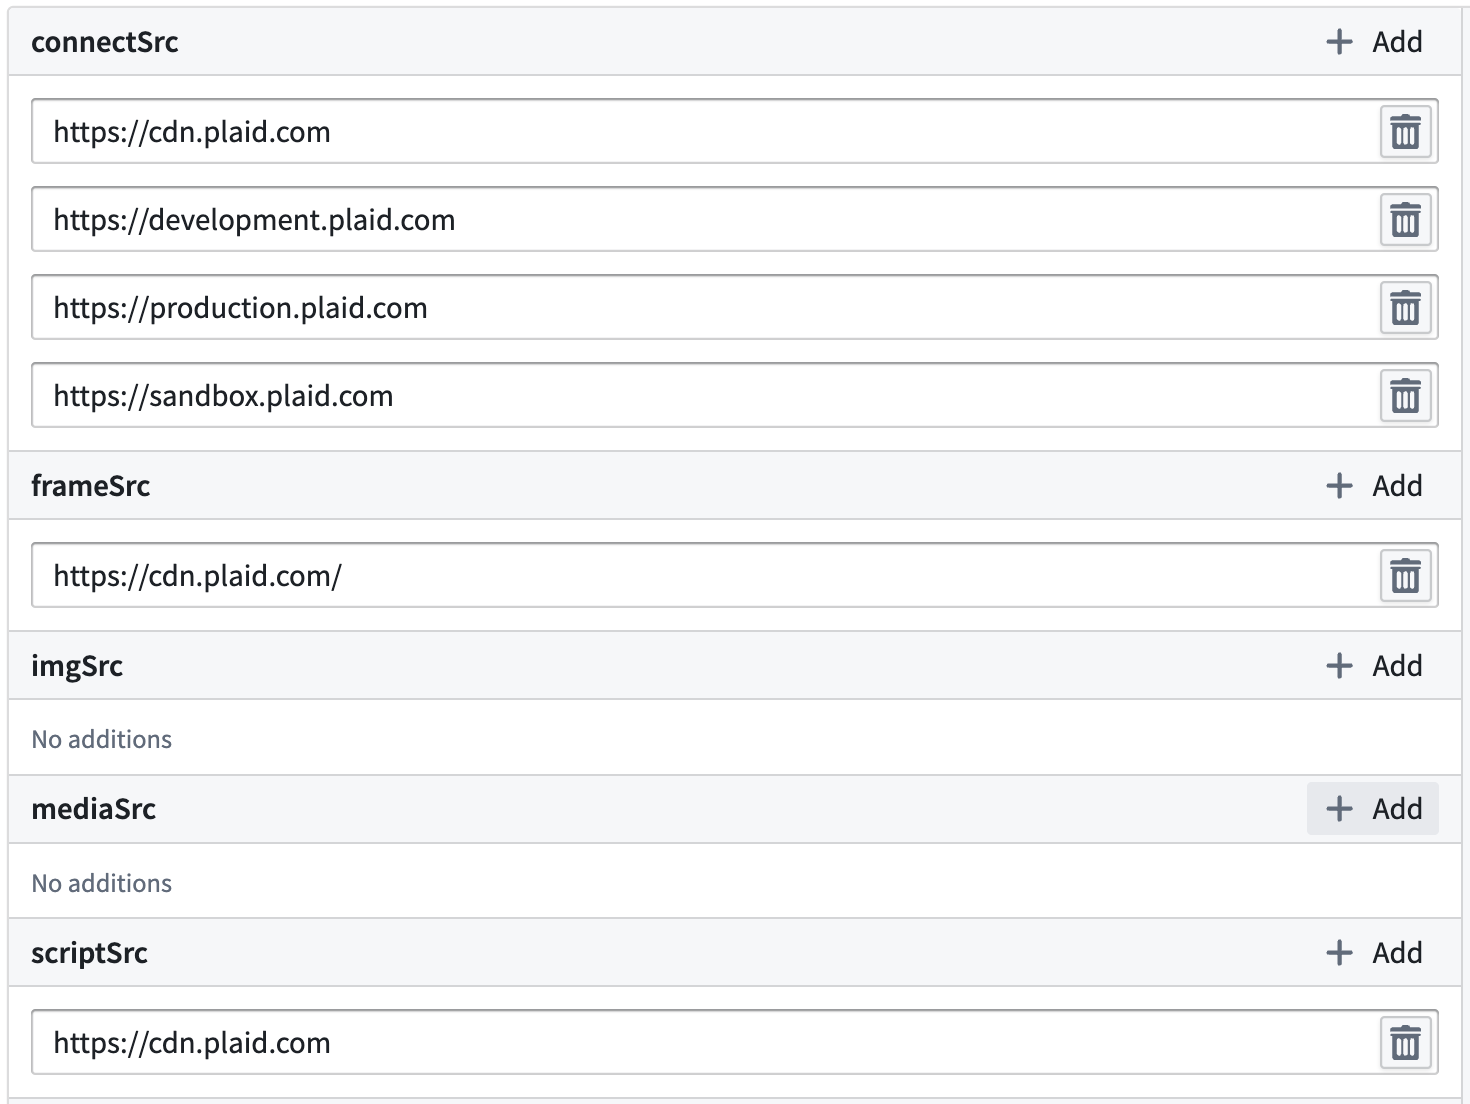
- Make sure to add the appropriate CSPs. Google the right CSPs and add them. The CSPs can be added in website hosting → advanced. Here are the policies that I have:
Step 5 - using the access token in transforms to pull bank data
- now that we have an access token we can actually pull data. First, create a materialization dataset so that you can use the encrpyted access tokens. Next, import your source into this code repositories, and add the transforms-external-systems library. Also add the cryptography library.
- Here is what the transform looks like. I am using lightweight. You will need to replace RIDs of the source and input dataset, and then create an output dataset. Also, if the source keys are different, you will need to replace those.
        from transforms.external.systems import ResolvedSource
        import polars as pl
        from transforms.api import transform, lightweight, Output, LightweightOutput, LightweightInput, Input
        from transforms.external.systems import external_systems, Source
        from cryptography.fernet import Fernet
        import requests

        @lightweight
        @external_systems(
            plaid_source=Source("ri.magritte..source.afa3a5ef-cb5f-40db-b9d7-e618fb4b45c0")
        )
        @transform(
            output=Output("ri.foundry.main.dataset.57bae725-43ad-4032-8e3b-8190981bf00c"),
            access_tokens_dataset=Input("ri.foundry.main.dataset.491b4433-9215-49d6-82da-1a95eb4f1fb9")
        )
        def compute(plaid_source: ResolvedSource, output: LightweightOutput, access_tokens_dataset: LightweightInput):

            client_id = plaid_source.get_secret("additionalSecretClientId")
            client_secret = plaid_source.get_secret("additionalSecretClientSecret")

            key_str = plaid_source.get_secret("additionalSecretEncryptionKey")
            key = key_str.encode()
            f = Fernet(key)

            def call_plaid_api(access_token: str) -> dict:
                """Call Plaid API (example: /accounts/get endpoint)."""
                url = "https://sandbox.plaid.com/accounts/get"
                headers = {"Content-Type": "application/json"}
                payload = {
                    "client_id": client_id,
                    "secret": client_secret,
                    "access_token": access_token,
                }
                response = requests.post(url, json=payload, headers=headers)
                response.raise_for_status()
                return response.json()

            def process_row(row):
                # 1. Decrypt the access token
                encrypted_token = row["access_token"].encode()
                decrypted_token = f.decrypt(encrypted_token).decode()
                # 2. Call Plaid API
                result = call_plaid_api(decrypted_token)
                return result

            filtered_df = access_tokens_dataset.polars().filter(pl.col("access_token").is_not_null())

            # Apply function to each row
            results = []
            for row in filtered_df.iter_rows(named=True):
                api_result = process_row(row)
                results.append(api_result)

            output_df = filtered_df.with_columns([
                pl.Series("plaid_response", results)
            ])

            output.write_table(output_df)
- Once this is working, you are done!
7 Likes
This is awesome! We are considering developing a foundational ontology that is open-source for finance and audit. This is a useful blueprint for us. We would be using the TypeScript SDK instead of the Python SDK, though. We also use a pattern that allows us to run the compute module and the React application in and out of Foundry. But other than that, our setups would be nearly identical. One note, you might simplify this a little with deployed pipelines, which allow you to pass inputs to your transforms from your applications directly.
3 Likes
Love this! I’m a bit of a novice on APIs and Plaid’s use here, so I’m hoping this gets me over the hurdle I’ve been stuck at of uploading CSVs. CSV upload has allowed me to build out a pretty solid UI for budgeting and spending, so I’m excited to full automate it here. Thanks!